Just a quick one. Added a black fill colour with low opacity to the board to give it a little bit of depth and separation from the background.

Nonoku - Creating a Background
So, I was getting bored of looking at a grey background and, as a break from cleaning up, refactoring, and adding the fiddly (nut necessary) UI code, I decided to run up a quick background.
The original version of Nonoku had a vertical gradient fill, light to dark, with subtle diagonal striping. I liked this so decided to reproduce it. However, it made sense to me to implement this in code. Since I’m using SpriteKit already, rendering to an SKEffectNode which rasterises the nodes made sense (the background is not animated so I can basically update once and be done).
There’s no native way, as far as I’m aware, to draw a gradient on a node, so the first thing would be to create an SKTexture. Again, since this is a one time deal, I’m not too worried. I’ve done something similar before so I already knew I could use a CIFilter to generate this. From that, I can get a CIImage. That can be passed to a CIContext to create a CGImage which can finally be passed to the SKTexture which I’ll pass into an SKSprite.
From reviewing the CIFilter documentation, I can get a list of available filters as follows:
class func filterNames(inCategory category: String?) -> [String]Even better, under the list of category constants, there is kCICategoryGradient. For this kind of quick exploratory code, I usually start a Swift Playground to spike out the things I don’t know.
So, skipping a step, I have this:
print("\(CIFilter.filterNames(inCategory: kCICategoryGradient))")
let filter = CIFilter(name: "CILinearGradient")
print("\(filter?.attributes)")
The list of filterNames has a couple of likely contenders, CILinearGradient and CISmoothLinearGradient. They take the same attributes (two colours, and two vectors) so I ended up trying both. In my use case I couldn’t see any difference between the two so decided to stick with CILinearGradient. If it ever comes up as an issue, it’s a very simple change to make.
CIFilter.attributes() gives me a list of the supported attributes, and a brief description of them. That's enough to define how I'm going to use it so I can leave the playground and come back to my code.
Since I want to create a new SKTexture with this gradient it makes sense to do it as an extension on SKTexture. I need the size, the start colour, and the end colour. I could add additional logic here but, following YAGNI (You Ain’t Gonna Need It), I am only interested in a vertical gradient so that’s all I’ll support.
extension SKTexture {
    convenience init?(size: CGSize, color1: SKColor, color2: SKColor) {
        guard let filter = CIFilter(name: "CILinearGradient") else {
            return nil
        }
        let startVector = CIVector(x: 0, y: size.height)
        let endVector = CIVector(x: 0, y: 0)
        filter.setValue(startVector, forKey: "inputPoint0")
        filter.setValue(endVector, forKey: "inputPoint1")
        filter.setValue(CIColor(color: color1), forKey: "inputColor0")
        filter.setValue(CIColor(color: color2), forKey: "inputColor1")

        let context = CIContext(options: nil)
        let rect = CGRect(x: 0, y: 0, width: size.width, height: size.height)
        guard let filterImage = filter.outputImage,
            let image = context.createCGImage(filterImage, from: rect) else {
            return nil
        }

        self.init(cgImage: image)
    }
}
Interestingly, whilst I can just get a ciColor from a UIColor (SKColor aliases UIColor), I can’t use it in the CIFilter due to the following issue.
*** -CIColor not defined for the UIColor UIExtendedSRGBColorSpace 0.666667 0.223529 0.223529 1; need to first convert colorspace.Instead, I had to create a new instance of CIColor with the UIColor. I’m not sure if there are any issues associated with this, but it’s working fine for me so far.
From there, I just created an SKSpriteNode with the generated texture. The lines were just stroked SKShapeNodes with a CGPath which just have a defined start and end point.
So here’s how it looks:

It’s still early so I’m not sure if this is the final version but it does make the game easier to play as it’s much easier to tell where the empty spaces are. Also, with this approach I can easily generate backgrounds with different colours so I have a bunch of options.
Unit Testing - Mocking In Swift
Mocking is a useful tool when writing unit tests. Due to limitations in the current swift version, there aren’t any real mocking frameworks like the ones you see for Java and Obj-C. That said, there are work arounds. Here’s a quick one when you need a one-off:
Method to test:
func crossDissolve(toIdentifier identifier: StoryboardIdentifier) {
    let nextViewController = viewController(forIdentifier: identifier)
    nextViewController.modalPresentationStyle = .fullScreen
    nextViewController.modalTransitionStyle = .crossDissolve
    show(nextViewController, sender: self)
}
This just performs a simple cross-dissolve between two view controllers (the one it’s on to the new one).There are four things to validate:
- The
UIViewControllerpassed toshow(_:sender:)is the one expect. - The
senderis correct - That the presentation style is
fullScreen - The transition style is
crossDissolve
Since it doesn’t return any values I’m going to have to capture them instead. The method under test is crossDissolve(…) so I don’t want to change that behaviour. Everything else is fair game though. In this case, if I intercept the call to show(…) I can capture the parameters passed and validate them.
Since this is a one-off I can nest a class inside my test and capture the values appropriately. Then I can fill in the test.
func testCrossDissolve() {
    class MockSut: UIViewController {
        var showViewController: UIViewController?
        var showSender: Any?
        override func show(_ vc: UIViewController, sender: Any?) {
            showViewController = vc
            showSender = sender
        }
    }
    let mockSut = MockSut()
    mockSut.crossDissolve(toIdentifier: .gameViewController)
    XCTAssertNotNil(mockSut.showViewController as? GameViewController)
    XCTAssertEqual(mockSut.showSender as? UIViewController, mockSut)
    XCTAssertEqual(mockSut.showViewController?.modalPresentationStyle, .fullScreen)
    XCTAssertEqual(mockSut.showViewController?.modalTransitionStyle, .crossDissolve)
}
So, we’re creating a subclass of UIViewController and overriding a method that is called by the method we are interested in testing. Then we can use assertions to complete our test.
Of course, this could get messy if we had a bunch of test cases which needed to handle overrides. In that case I’d move the MockSut class out of the function and into the parent class. If I needed it outside of this specific set of tests, I’d move it into its own class so it could be used in multiple places.
Cleaning Up The Code
So, looking back over the last code, I realised that I was overthinking it massively. The original reasoning behind it didn’t hold up, so I fixed it.
protocol NavigationProtocol {
    func viewController(forIdentifier identifier: StoryboardIdentifier) -> UIViewController
}

extension NavigationProtocol {
    private var storyboard: UIStoryboard {
        return UIStoryboard(name: "Main", bundle: nil)
    }

    func viewController(forIdentifier identifier: StoryboardIdentifier) -> UIViewController {
        return storyboard.instantiate(withIdentifier: identifier)
    }
}
Yep, that’s a bit smaller. Hooray.
Bonus - time for unit tests ;)
func testInstantiateViewController_Splash() {
        let viewController = sut.viewController(forIdentifier: .splashViewController)
        XCTAssertTrue(viewController is SplashViewController)
    }

    func testInstantiateViewController_MainMenu() {
        let viewController = sut.viewController(forIdentifier: .mainMenuViewController)
        XCTAssertTrue(viewController is MainMenuViewController)
}Swift Generics
After installing SwiftLint I was going through resolving the issues. Fortunately, I hadn’t too many problems, mostly because it’s still a small project.
Some longish lines did catch my attention though.
enum StoryboardIdentifier: String {
    case splashViewController
    case mainMenuViewController
    case levelSelectViewController
    case optionsViewController
    case gameViewController
}

fileprivate extension UIStoryboard {
    func instantiateAppViewController(withIdentifier identifier: StoryboardIdentifier) -> UIViewController {
        return instantiateViewController(withIdentifier: identifier.rawValue)
    }
}

fileprivate class NavigationAssistant {
    private static let mainStoryboard = UIStoryboard(name: "Main", bundle: nil)

    private static var splashViewController: SplashViewController {
        return (mainStoryboard.instantiateAppViewController(withIdentifier: .splashViewController) as? SplashViewController)!
    }

    private static var mainMenuViewController: MainMenuViewController {
        return (mainStoryboard.instantiateAppViewController(withIdentifier: .mainMenuViewController) as? MainMenuViewController)!
    }

    private static var levelSelectViewController: LevelSelectViewController {
        return (mainStoryboard.instantiateAppViewController(withIdentifier: .levelSelectViewController) as? LevelSelectViewController)!
    }

    private static var optionsViewController: OptionsViewController {
        return (mainStoryboard.instantiateAppViewController(withIdentifier: .optionsViewController) as? OptionsViewController)!
    }

    private static var gameViewController: GameViewController {
        return (mainStoryboard.instantiateAppViewController(withIdentifier: .gameViewController) as? GameViewController)!
    }
As often seems to happen, on revisiting I can see a way to improve it. First off, it's a little bit verbose in the naming. Changing instantiateAppViewController to just instantiate shortens everything up to get it well under the limit. AppViewController is superfluous, named only to stop a naming collision between the extension and the actual class, and ViewController for the thing it is returning. instantiate could possibly be improved upon but it's clear enough in context for the moment.
That’s minor stuff though. What really caught my eye is that I’m repeating the same code over and over. That cast is kind of messy since I’m kind of cheating SwiftLint there. Without that I had return mainStoryboard.instantiateAppViewController(withIdentifier: .splashViewController) as! SplashViewController which is marginally shorter but it’s not really the problem. What I don’t like is that it’s the same call each time with the only change being the Type I’m casting to. If, instead of casting back as a UIViewController, I was to cast back as the type I was expecting then that would save a bunch of repeated code.
I’ve used generics a bunch of times but I keep forgetting about them - at least when I’m first writing out the code. That’s not necessarily a bad thing since the current way works and I’ve come back to it eventually to clean things up. That’s partly my reasoning for writing this post though, to remember to use these things (appropriately).
So, modify the call which returns the UIViewController to return a generic. Easy:
fileprivate extension UIStoryboard {
    func instantiate<T>(withIdentifier identifier: StoryboardIdentifier) -> T {
        return (instantiateViewController(withIdentifier: identifier.rawValue) as? T)!
    }
}
Fairly straight forward, still have that ugly ‘cast to optional, force unwrap’ to appease SwiftLint. Wait a second, SwiftLint also has a rule about force unwrapping! Optional, but maybe there’s a better way.
guard let viewController = instantiateViewController(withIdentifier: identifier.rawValue) as? T else {
    fatalError("Could not instantiate viewController")
 }
return viewController
There we go. Now it’s explicit what the behaviour is meant to be. It’s a little more code but no-one scanning the code should be confused by the intent.
So the whole thing looks like this now. Much better. The repeated logic is now in a single place. I'm happier with how it looks and, whilst there might be more lines, it feels more compact. I think there are some other improvements that can be made but that goes outside the scope of this post.
enum StoryboardIdentifier: String {
    case splashViewController
    case mainMenuViewController
    case levelSelectViewController
    case optionsViewController
    case gameViewController
}

fileprivate extension UIStoryboard {
    func instantiate<T>(withIdentifier identifier: StoryboardIdentifier) -> T {
        guard let viewController = instantiateViewController(withIdentifier: identifier.rawValue) as? T else {
            fatalError("Could not instantiate viewController")
        }
        return viewController
    }
}

fileprivate class NavigationAssistant {
    private static let mainStoryboard = UIStoryboard(name: "Main", bundle: nil)

    private static var splashViewController: SplashViewController {
        return mainStoryboard.instantiate(withIdentifier: .splashViewController)
    }

    private static var mainMenuViewController: MainMenuViewController {
        return mainStoryboard.instantiate(withIdentifier: .mainMenuViewController)
    }

    private static var levelSelectViewController: LevelSelectViewController {
        return mainStoryboard.instantiate(withIdentifier: .levelSelectViewController)
    }

    private static var optionsViewController: OptionsViewController {
        return mainStoryboard.instantiate(withIdentifier: .optionsViewController)
    }

    private static var gameViewController: GameViewController {
        return mainStoryboard.instantiatZ(withIdentifier: .gameViewController)
    }
Nonoku - Scrolling Level Select
Combining an SKNode with a UIScrollView. These are two things which don’t go together natively. However, I wanted a scrolling view. I didn’t want to re-implement the UIScrollView in SpriteKit. I also didn’t want to have to handle rendering the puzzle to a UIImage and create UIImageViews when I already had a perfectly good method for building an SKNode from the tiles. A little modifying to let me add it to an SKEffectNode and I had my image. Create a new SKScene and present it in my view and I have part of the solution.
Adding it to the UIScrollView isn’t possible, but getting the offset of the scrollview is so if I tell it the content is larger than the screen. Say, large enough to fit the grid of puzzle images, I could attach those images to a SKNode and move it by the offset.
extension ViewController: UIScrollViewDelegate {
    func scrollViewDidScroll(_ scrollView: UIScrollView) {
        gridNode.position.x = -scrollView.contentOffset.x
          gridNode.postion.y = scrollView.contentOffset.x
    }
}
I only care about horizontal movement. The gridNode is positioned at 0,0 in the scene. Horizontal movement is inverted, relative to the offset. Vertical movement is not because the SpriteKit coordinate system is inverted vertically compared to the UIView coordinates. In SpriteKit, 0,0 is in the bottom-left of the screen and increasing the y-coord moves it towards the top, UIView would put it in the top-left and increasing the y-coord moves it towards the bottom.
Since the scene is sitting behind the components I still get the UIScrollView scroll bars, and any other controls I might add and now I don’t have to re-implement the UIScrollView.
Next up, passing a touch event through to the scene.

Nonoku - Puzzling It Out
Added the game mechanic where the number of hidden tiles matching the selected tile colour is revealed. This will need prettifying later but, for now, the next step is to add more puzzles to the game so that it’s playable.

Nonoku - Taking Shape
It's now possible to select areas and fill them in based on the colour selected. Incorrectly coloured tiles will not be revealed. This feels like a very big step and, ultimately, it all fell into place in just a few lines of code.
Looking back, I've clearly grown as a developer since I wrote the first version. Whilst I've made decisions that simplify the interface, I've also implemented a lot of the functionality that caused me a lot of pain before in just a few lines now. Part of that is making better technical decisions up front, another part is using the right tools. Another big piece is just having more experience in more areas so I have more ideas of what is going to be available to me before I start coding.
Overall, I'm happy with the progress so far and I'm glad I'm making the time to go back update an old project.

Nonoku - A Quick Update
Trying to keep things going as and when I can. This is a super quick-update just to display the correct buttons for the current puzzle. I know I'll be swamped for the next few days so grabbing 15 mins just to get another little piece done is going to be vital.

The selected area can be changed by dragging around on the board
Nonoku- Selecting Things

Nonoku - Something Familiar
A quick recreation of the first puzzle from Nonoku’s original release. Underpinning it is a simple struct that holds the board layout and colours (I didn’t update the button handling to show them yet).
The actual tiles are hardcoded as a string that gets parsed into a 2D array. I’ll need something a bit more flexible in future but this will suffice for getting content on screen.
I’m now testing it on actual hardware, instead of just running in the simulator. The signing process seems to have been improved a lot in Xcode 8 which is nice.
About as basic as it gets...

Nonoku - Coloured Buttons
The eternal question when writing from a coder’s perspective, UK English, or US English, spelling. Context seems important to me. Mostly I will spell using US English standards since that’s the environment I’m coding in (Color, Center, Synthesize). When writing documentation, except when specifically referencing code, I’ll default to UK English (Colour, Centre, Synthesise). In an IDE it’s hard to type the UK English variant, in a document editor, it’s hard to type the US English spelling. Maybe it’s purely contextual and if I was updating a document that was in US English I’d automatically switch. I certainly find that with the minor differences between Windows and OS X keyboard layouts when I switch between them.
Anyway… More buttons. These ones are in the game itself and allow the selection of different colours to fill in the puzzle. It automatically scales to allow different numbers of colours. Eight seems to be the upper practical limit for fitting them into the UI.
More PaintCode shenanigans. I’ve also got Telekinesis working. I’m not really doing anything fancy enough to warrant it but it’s fun to play with a little. These buttons are two separate elements. One rounded rectangle that I can scale whilst maintaining the aspect ratio, and the circular ‘button’ part which has an inner shadow (as a highlight) and an outer shadow to give it a little depth. The highlight and the shadow are set according to the colour of the button. Not being familiar with PaintCode, I tried doing it as a single element. Since I needed different scaling that proved tricky. I got close with the Frames and Constraints but it wasn’t quite right. In the end, it was faster (and more logical) to split it out into separate pieces.
And yes, I am procrastinating on the next part. I need to add the game part of this game. I mostly have the shape of it in my head and I’ve messed with a couple of implementations but I’m waiting for it to feel right before I commit to something.

On an iPhone 5, just about enough room, with a little tweaking. However, loads of room below so maybe two separate rows on a phone would work,,,

On the iPad, only enough vertical space for a single row but horizontally it's fine.
Nonoku - Buttons
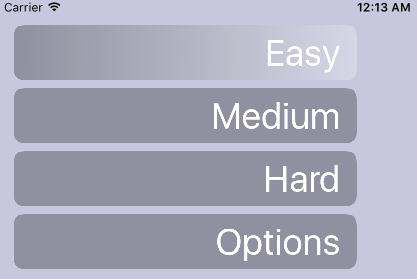
Real life caught up so only a little progress. Started experimenting with some graphics tools just to change things up. Nothing final yet but this was quick enough to implement. I used PaintCode to draw out the button and add a gradient fill I could swap with the flat background by setting a flag. Then all I had to do was create a custom UIControl to draw the button.
The text is defined at run-time so could be localised in future if I stick with this style.
override func draw(_ rect: CGRect) {
    NonokuKit.drawMenuButton(frame: bounds, tapped: tapped, text: text)
}
So simple it's barely even worth including.

Nonoku - Simple Interactions
Another quick one. Added some touch interaction so that the tiles can be tapped and go from a hidden to a visible.
SKNodes can’t be tapped whilst they are hidden (or have an alpha of 0). In order to detect them, I’m checking the location of the touch even on the parent node and checking to see if it’s within the bounds of any of the tiles. If it is, I’m currently just marking them as visible.
override func touchesBegan(_ touches: Set<UITouch>, with event: UIEvent?) {
        guard let location = touches.first?.location(in: tileNode) else { return }
        for case let node as SKShapeNode in tileNode.children {
            if node.contains(location) && node.isHidden {
                node.isHidden = false
                break
            }
        }
    }
Nonoku - Adding Some Color
Just a small update this time. Added some placeholder tiles to the board. A little bit of tidying as well. Mostly moving some values into constants for re-use elsewhere. The only thing of note is using an SKCropNode with a rounded rect, set to the same size as the board, so that the tiles always fit within the same space.
private func addTiles(parent: SKNode) {
        let tileColor: [UIColor] = [SKColor(colorLiteralRed: 200/255, green: 182/255, blue: 240/255, alpha: 1),
                                    SKColor(colorLiteralRed: 164/255, green: 134/255, blue: 222/255, alpha: 1),
                                    SKColor(colorLiteralRed: 131/255, green: 95/255, blue: 200/255, alpha: 1)]
        let tileSize = boardWidth / 10
        for col in 0..<10 {
            for row in 0..<10 {
                let xValue = CGFloat(col)
                let yValue = CGFloat(row)
                let rect = CGRect(x: tileSize * xValue, y: tileSize * yValue, width: tileSize, height: tileSize)
                let tile = SKShapeNode(rect: rect)
                tile.fillColor = tileColor[((row * 10) + col) % tileColor.count]
                tile.strokeColor = tile.fillColor
                parent.addChild(tile)

            }
        }
    }
Nonoku - First Steps With SpriteKit
I’ve not had an excuse, up to now, to play with SpriteKit. Initially I was going to re-write Nonoku following the same basic implementation as I did before with custom UIView elements. Whilst walking back from lunch, I wondered if I could come up with something that wouldn’t stretch my limited artistic abilities but still look nice. Adding a little more motion to it would be good but that wouldn’t really fit with UIView and autolayout. So, I decided to give SpriteKit another look.
I’d taken a glance at it before but not in any real depth and I was pretty sure I’d missed some stuff in just following tutorials.
So, first step, get an SKView in my GameViewController class. Easy enough, I’m using a storyboard so just change the class of the View belonging to the UIViewController to an SKView. It’s still a UIView when referencing it in code so I need to remember to cast it when using it: view as! SKView.
override func viewDidLoad() {
        super.viewDidLoad()
        let spriteView = view as! SKView
        spriteView.showsFPS = true
        spriteView.showsDrawCount = true
        spriteView.showsNodeCount = true
    }

    override func viewWillAppear(_ animated: Bool) {
        super.viewWillAppear(animated)
        let gameScene = GameScene(size: view.bounds.size)
        let spriteView = view as! SKView
        spriteView.presentScene(gameScene)
    }
Easy enough. I also need something to show so I included a GameScene object. This is just a starting point so I’ll start with drawing the board the tiles will be displayed on.
The board is a rounded rectangle, divided into a 10x10 grid by dashed lines. Since I don’t expect this to change I added the board outline, and the lines, to an SKEffectNode with shouldRasterize set to true. This means it will render itself to a cached bitmap so it can be re-rendered quickly, instead of re-drawing each node every frame. The number of draw calls dropped from 20, to 1, with this change. Whilst optimising upfront is normally to be avoided, this is a small change and easily reversed. More importantly, it’s something to be remembered later. Considering how multiple items can be grouped together can bring noticeable performance improvements.

Nonoku - The Rewrite
Trying to spend a little bit more time working on my own projects. Here's the first commit. A quick storyboard sketch of the all the principle screens in the app - splash screen, menu, options, level select, game. Navigation is by buttons. I didn't hook up segues so instead control navigation by instantiating my views from the storyboard and calling show to transition between them.
Each ViewController in the storyboard has a unique identifier that maps to a value in an enum. I’ve added a helper that includes an extension to UIViewController to handle the crossDissolve. All I need to do is pass a valid identifier to it and I’m done. To go back, I can call dismiss (e.g. dismiss(animated: true, completion: nil)).
Acquisition: Live on the App Store
So I started with (not so) grand ambitions of walking through the process of reviving Acquisition. What actually happened was a few flurries of activity which eventually got it working again across all device sizes in a way that will hopefully hold up. The only real pain point in the end was fixing the iPad issues. Since I couldn't change from a universal app to an iPhone only one (intended as a temporary fix since resolving the iPhone issues was slightly easier and would ensure that everyone has a working version) I had to get it all working in one go.
The most important thing is that it's working properly, again (and has been for a couple of months now). So far, no crashes.
You can download it from the app store.
Acquisition: Bringing it back to life
The first game I launched on the App Store, targeting iOS 4.3... It still sells on occasion and I've found some problems with it. This is some early code so it'll be an interesting experiment to see just how difficult it is to resurrect to a working state. Let's see what we're working with...
2016-02-29 22:16:54.449 Acquisition[27180:2115785] *** Terminating app due to uncaught exception 'NSInternalInconsistencyException', reason: 'Application windows are expected to have a root view controller at the end of application launch'
Uh oh... That's an auspicious start. Let's get this show on the road. I've seen this error before so I know how to fix it. Just go into the AppDelegate and add the following line:
[self.window setRootViewController:viewController];
And we're in... ok - next.

... ok then
Hmm, didn't know it was going to be this bad. Time to do some heavy duty cleaning.
Unity: Building a keypad - Redux
One of the more popular posts has been on creating a keypad. However, I hadn't really thought of it as a tutorial and just as an example of something I'd been messing with. It's time to address that.
The full project is available on Github: https://github.com/stepheng/UnityKeycodeExample

This is what we're going to end up with...
This differs from the previous version in that the UI runs in the world space. This is based on some pictures of touch screen based keypad door locks I've seen. So, the first step is to set up the scene.
Create an Empty Object at 0,0,0.
Add a Cube to the object and scale it to 1, 4/3, 0.1. Our keypad is going to have a 3:4 aspect ratio as our button layout will be 3x4.

Create a new, dark, material, and apply it to the cube. Just create a New Material and change the Albedo colour to something close to black. Give it a smoothness of 0.75. This isn't required but will make the lights we're going to use to show the status of the keypad more visible.

Add a Canvas to the empty object. Position it at 0, 0, -0.0501.
Set the Render Mode to World Space.
Since we're rendering the UI in world space we need to set an appropriate size and scale. The Width and Height values are used for rendering the UI whilst the Scale is used for rendering it in the world. We're maintaining a 3:4 ratio for the Canvas so the values need to be a suitably scaled up version. I picked 900 and 1200 for my Canvas. Set the X and Y scales to be 1/Width (in my case, 1/900). You'll see that the Canvas will be scaled to the size of the Cube.

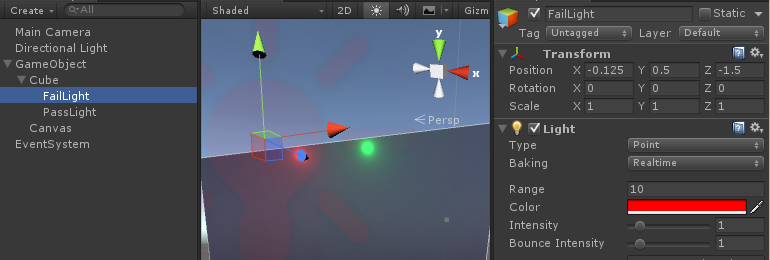
Add two new point lights to the Cube Set one to red, and one to green. These will be the indicators that the keypad is working. Set the light positions at -0.125, 0.5, -1.5, and 0.125, 0.5, -1.5.
Create a Button on the Canvas. We'll be resizing it in code later so the actual values we use here don't matter too much. Set an image for the button background. I made a 256x256 circle (filled white on transparent background) to get a higher quality image. If you don't want to use that, the Knob image that is included in Unity will work for test purposes.
Set the colour to #92B2FFFF and change the normal colour to #FFFFFF00, the highlighted colour to #F5F5F540, and the pressed colour to #FFFFFFFF. This will tint the image we're using as the background of the button to a light blue. We're making it transparent when the button isn't active, partially visible when the mouse hovers over it, and fully opaque when pressed. I also increased the Fade Duration to 0.25. Play around and find something you like.

Expand the Button in the object Hierarchy window so you can see the Text object. Set the colour to the same value you used as the image background (e.g. #92B2FFFF). You can change this if you want a different effect.
Drag the Button object into the Assets window to create it as a prefab. Delete the Button object from the Hierarchy.
Time to do some scripting. I'm assuming C# for these purposes.
Create a new script called Keypad and another called KeypadHandler.
Add Keypad to the Canvas, and KeypadHandler to the Cube.
In Keypad, declare an Interface for the keyboard.
internal interface IKeypadInterface {
    void KeypadSuccess(Keypad keypad);
    void KeypadFailure(Keypad keypad);
    void KeypadUpdated(Keypad keypad);
}

public class Keypad : MonoBehaviour {

}
We'll use this for communicating events that occur on the Keypad.
The next step is to build the keypad.
[RequireComponent(typeof(Canvas))]
public class Keypad : MonoBehaviour {
    Canvas parent;

    [SerializeField]
    Button buttonPrefab = null;

    [SerializeField]
    int columnCount = 3;

    [SerializeField]
    string[] buttonValues = { "X", "0", "OK", "1", "2", "3", "4", "5", "6", "7", "8", "9" };

    [SerializeField]
    int submitIndex = 2;

    [SerializeField]
    int cancelIndex = 0;

    [SerializeField]
    string keycode = "1234";

    [SerializeField]
    GameObject keypadHandler;
    IKeypadInterface keypadInterface;

    string internalKeypadValue = "";
    public string KeypadValue {
        get { return internalKeypadValue; }
    }

    // Use this for initialization
    void Start() {
        parent = GetComponent<Canvas>();
        keypadInterface = keypadHandler.GetComponent<IKeypadInterface>();

        BuildKeypad();
    }
}
There's a bunch of stuff here, but to break it down.
We're declaring some variables and using [SerializeField] to tell Unity to make them available in the inspector. This allows us to configure our keypad. buttonPrefab will be the prefab we created earlier. buttonValues is an array we use to label the buttons. submitIndex and cancelIndex are the index of the buttons which submit the code, or cancel it. the Canvas parent is a reference to the Canvas object our Button is in. We get that in the Start method. keypadHandler is the GameObject we added the KeypadHandler the script to, and keypadInterface is used to get the reference to the script class itself since Unity won't recognise the interface we declared in the inspector.
Add a new method, BuildKeypad, to generate the buttons.
    private void BuildKeypad() {
        // Get canvas size and correct for scaling
        RectTransform rectTransform = parent.GetComponent<RectTransform>();
        float parentWidth = rectTransform.rect.width * parent.scaleFactor;
        float parentHeight = rectTransform.rect.height * parent.scaleFactor;

        // Calculate button size
        float buttonSize = parentWidth / columnCount;
        // Minimum x position
        float buttonXStart = -(parentWidth - buttonSize) / 2;
        // Minimum y position
        float buttonYStart = -(parentHeight - buttonSize) / 2;
        Vector3 buttonPos = new Vector3(buttonXStart, buttonYStart, 0);
        for (int i = 0; i < buttonValues.Length; i++) {
            // Create new button from prefab
            Button button = Instantiate<Button>(buttonPrefab);
            // Add button to the Canvas
            button.transform.SetParent(transform, false);
            // Set button text
            button.GetComponentInChildren<Text>().text = buttonValues[i];
            // Set position of button
            button.GetComponentInChildren<RectTransform>().anchoredPosition = buttonPos;
            // Set size of button
            button.GetComponentInChildren<RectTransform>().sizeDelta = new Vector2(buttonSize, buttonSize);
            // Create a new primitive within the loop for the button, otherwise it will use the last value of i
            int buttonIndex = i;
            // Call ButtonPress with buttonIndex when a button is clicked
            button.onClick.AddListener(delegate { ButtonPress(buttonIndex); });
            // Increment x position
            buttonPos.x += buttonSize;
            // If we're at the far column, reset x and increment y
            if (i % columnCount == columnCount - 1) {
                buttonPos.x = buttonXStart;
                buttonPos.y += buttonSize;
            }
        }
    }
Not much to add that isn't in the comments. This assumes square buttons so you could have separate values for the width and height of the buttons.
Lastly, add methods to handle button presses and validation of the keypad value.
    void ButtonPress(int buttonIndex) {
        if (buttonIndex == cancelIndex) {
            internalKeypadValue = "";
            keypadInterface.KeypadUpdated(this);
            return;
        } else if (buttonIndex == submitIndex) {
            ValidateKeypadValue();
            return;
        }

        string buttonValue = buttonValues[buttonIndex];
        internalKeypadValue += buttonValue;
        if (keypadInterface != null) {
            keypadInterface.KeypadUpdated(this);
        }
    }

    void ValidateKeypadValue() {
        if (internalKeypadValue.Equals(keycode)) {
            keypadInterface.KeypadSuccess(this);
        } else {
            keypadInterface.KeypadFailure(this);
        }
        internalKeypadValue = "";
    }
ButtonPress(int) will be called when a button is clicked on. If buttonIndex matches cancelIndex, we reset the value and call KeypadUpdated(Keypad). ValidateKeypadValue() will be called when OK is clicked. This will fire KeypadSuccess(Keypad), or KeypadFailure(Keypad), and reset the value. If neither are matched, we get the string value of the button from our buttonValues array and append it to the internalKeypadValue string.
Validating the value is just a simple string comparison. We can set the value we use for comparison directly in the Unity inspector window so our keypad can be re-used in multiple locations with different codes without any code changes.
Open the KeypadHandler script. This one is much simpler.
public class KeypadHandler : MonoBehaviour, IKeypadInterface {

    [SerializeField]
    Light failLight = null, passLight = null;

    void Awake() {
        failLight.enabled = false;
        passLight.enabled = false;
    }

    public void KeypadSuccess(Keypad keypad) {
        passLight.enabled = true;
    }

    public void KeypadFailure(Keypad keypad) {
        failLight.enabled = true;
    }

    public void KeypadUpdated(Keypad keypad) {
        Debug.Log(keypad.KeypadValue);
        passLight.enabled = false;
        failLight.enabled = false;
    }
}
We set IKeypadInterface as an interface on this. Then declare the point lights we created earlier. In Awake, we turn the lights off by disabling them. Then we implement the methods declared in IKeypadInterface. On success, we enable passLight. On failure, we enable failLight. On a normal update (any keypress except 'OK') we turn the lights off.
Check everything builds. Fix any errors.
Now all we need is to hook everything up. Go back to Unity and select the Cube. If the scripts are compiling successfully you'll see Fail Light and Pass Light fields in the inspector under KeypadHandler script. Drag the appropriate point lights from the Hierarchy window to the fields (you can also click on the target icon to the right of the field and assign from that window).

Now, select the Canvas. Under the Keypad (Script) section you'll see our new fields. The only ones you need to set are Button Prefab (drag in the Button prefab we created earlier) and the Keypad Handler. Drag the Cube to the Keypad Handler field and we're done.

Try entering a pass code (1234 by default), or try entering the wrong one and trying to submit it. Check that the lights are hooked up. If everything's working you should be finished. To take it further, implement a new handler for unlocking a door. This could even be, plausibly, expanded to provide a basic UI for more complicated controls (e.g. remote controlling items in the world, basic menu/dialog selection).

The full project is available on Github: https://github.com/stepheng/UnityKeycodeExample